Flooring cost per m² in Australia can look simple, but it changes quickly once you move from a price guide to a real job. In this 2025 guide, we’ll break costs down by material type and explain why “per m²” varies—from supply price to labour, prep, and finishing details. The goal is to help you make an informed decision, not guess.
We’ll also clear up the basics like square metre vs square foot, then show what actually drives the total: cost drivers (materials + labour), your project scope, and the contractor estimate components that get missed in rushed quotes. By the end, you’ll know what a fair flooring price per m² looks like and what to ask for before you commit.

What “Cost Per m²” Includes (and What It Usually Excludes)
When you see a flooring cost per m² in Australia, it’s easy to assume it covers everything. Often, it doesn’t. This section helps you compare quotes properly by showing what’s usually included (basic material costs and labour costs) and what gets added later as separate lines. That’s how you avoid surprises and budget with confidence.
A good rule is to ask: is this a supply number, an install number, or supply and install flooring cost per m²? Once you know that, you can read the contractor estimate components like a checklist and spot gaps before they become unforeseen issues during the installation process.
Supply-Only Vs Install-Only Vs Supply-And-Install
Supply-only pricing is mostly the material supply cost. Install-only refers mainly to installation labour rates. Supply-and-install combines both, so it looks higher—but it may actually be the fairer comparison. People get caught when they compare a cheap “flooring supply only cost per m²” quote to a full “flooring installation cost per m²” offer. That’s not a true like-for-like comparison, and it can lead to the wrong informed decision for your project scope.
- Supply-only (materials): Covers boards/tiles only; labour is separate and still needs pricing.
- Install-only (labour): Covers laying/fitment; materials and most extras are still separate.
- Supply + install (combined): Often clearer for budgeting because it bundles the main parts.
- Quote comparison trap: One looks cheaper because it excludes labour or key items.
- Ask for line items: Request a breakdown of contractor estimate components before deciding.
- Match the scope: Compare the same rooms, same finish, same inclusions.
The “Commonly Excluded” Items That Change The Final Total
Even when a quote says “per m²”, it may skip the items that make the job work on site. The biggest ones are subfloor prep cost (levelling, patching), underlay cost upgrades, and adhesives and trims. Moisture control can also matter in Australia, especially with concrete slabs, humidity levels, or excessive moisture. These are the “hidden flooring costs” that create variations if they aren’t shown upfront as separate line items.
- Removal & disposal: Pulling up old flooring, dumping fees, and skip bins.
- Subfloor prep & levelling: Grinding, patching, self-levelling compound, fixing dips.
- Moisture control: Barriers, primers, testing allowances where needed.
- Underlay upgrades: Better acoustic or comfort underlay changes totals fast.
- Adhesives, trims & transitions: Glue, scotia, thresholds, door bars, edge trims.
Flooring Cost Per m² in Australia (2025) — By Material Type
In the Australian market, “flooring cost per m²” swings mainly because materials and labour don’t move together. Some floors look cheap to buy but cost more to install. Others cost more upfront but give a better finish in the long run. This section breaks it down by material type so you can budget and choose with less guesswork.
These ranges are typical 2025 guides, not fixed prices. Your final figure depends on project scope, finish expectations, and any prep work that sits outside the basic supply-and-install rate.
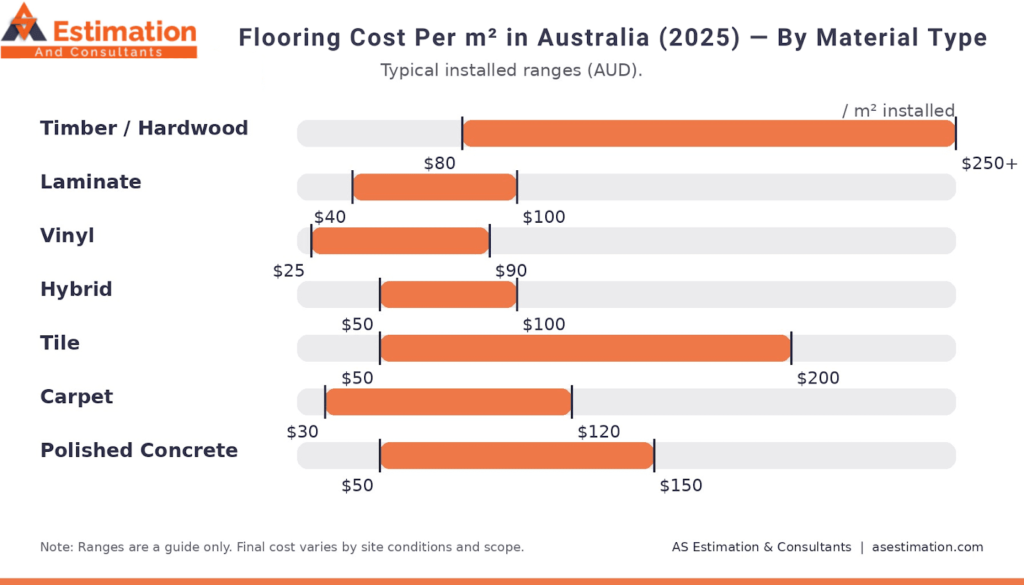
Timber / Hardwood flooring
Timber sits in the premium end because timber flooring price changes with species, grade, and board width, and the installation needs more care to look right. A common 2025 guide puts timber/hardwood in the $80–$250 per m² installed range, depending on product quality and finish.
If you separate it out, a typical benchmark is $50–$150 per m² for materials plus $40–$80 per m² for installation labour rates in major cities, before you add any prep. That’s why timber can be an excellent investment for aesthetic appeal and long-term value, but it needs a clear scope and quality installation.
Laminate flooring
Laminate flooring stays popular because it hits the “budget flooring” brief while still looking close to hardwood floors from a distance. In 2025 guides, laminate is often shown at around $40–$100 per m² installed, depending on quality tier and inclusions.
A common breakdown is $20–$50 per m² for laminate flooring plus $25–$30 per m² to install, but that assumes a decent base and standard details. Underlay cost, adhesives and trims, and moisture control (where there’s excessive moisture risk) can shift totals quickly, so it’s worth reading the estimate inclusions line by line.
Vinyl / Hybrid flooring
Vinyl and hybrid tend to suit high-traffic areas well, and many homes pick them for practical performance with manageable material costs. In 2025 pricing guides, vinyl is often shown around $25–$90 per m² installed, while hybrid commonly lands around $50–$100 per m² installed, depending on quality and prep.
Where costs jump is usually the subfloor prep cost. Vinyl/hybrid needs a smooth base. If you need levelling, patching, or extra adhesive work, the “installed” figure moves fast. That’s why professional installation can be worth it here—good prep protects the finish quality impact and reduces call-backs later.
Tile flooring
Tiles can look reasonable on supply price, but tile flooring is labour-heavy. A 2025 guide shows tiles around $50–$200 per m² installed, and another breaks it down as $30–$150 per m² for tiles plus $30–$120 per m² labour, depending on complexity and location.
Layout choices drive the total. Cutting, grout lines, waterproof zones, and levelling all add time to the installation process. If you go for large-format tiles or complex patterns, expect higher labour costs and more scope for unforeseen issues if prep isn’t allowed for upfront.
Carpet
Carpet remains a common choice when comfort matters, but the “per m²” number depends heavily on underlay and edges. One 2025 guide puts carpet broadly around $30–$120 per m² installed, while another notes $55–$75 per m² as a typical installed benchmark for carpet laying in Australia (varying with scope and underlay).
Stairs and lots of doorways usually cost more because they add cuts, joins, and time. If you want a quote that holds, make sure underlay cost and any removal/disposal are clearly listed as contractor estimate components—not assumed away.
Polished concrete
Polished concrete pricing depends on what you’re starting with. If the slab is in good shape, the cost of polished concrete flooring can be competitive. A 2025 guide commonly places it around $50–$150 per m² installed, while other 2025 sources show ranges like $60–$120 per m² depending on finish level.
The big drivers are patchwork, grind level, sealing, and the sheen you want. A basic “grind and seal” sits lower, while mechanically polished, high-gloss finishes can reach $100+ per m². It has strong aesthetic appeal, but the subfloor prep cost and finish quality impact are what decide the final number.
The Biggest Cost Drivers (Why Two Quotes Can Differ a Lot)
In this blog, “How Much Does Flooring Cost Per m² in Australia? (2025 Guide by Material Type)”, This section explains what affects the flooring cost estimate per m² after you’ve picked a material. Two quotes can look miles apart because the real price is built from cost drivers (materials + labour), plus site conditions that change the project scope.
Most differences come from labour costs, prep work, and the “small items” people forget. When those aren’t priced clearly, you get unforeseen issues during the install and the total moves after the job starts.
- Prep & moisture: Subfloor prep cost, levelling, moisture control allowances
- Labour complexity: Stairs, patterns, access, time on tools
- Finish level: Better finish needs more time and care (finish quality impact)
- Location: Regional cost differences, freight, and installer availability
- Details: Adhesives and trims, transitions, doorways, edges
Subfloor prep + moisture control (the most common price swing)
This is the biggest swing because you can’t “hide” a bad base. If the subfloor isn’t flat, you may need grinding, patching, or levelling, and that subfloor prep cost can add up fast. On concrete slabs, moisture risk matters too. Humidity levels and excessive moisture can trigger extra steps like primers or moisture barriers.
Good estimates either include prep as a clear line item or explain the allowance and the rule for adjustment. That’s part of solid estimating methods—you price what you can see, and you allow for what you can’t confirm until the floor is exposed.
Labour complexity (stairs, patterns, access)
Labour costs rise when the job takes longer, even if the flooring product stays the same. Stairs, tight hallways, lots of doorways, and tricky edges all slow the installation process. Patterns like herringbone or chevron add measuring, cutting, and checking. That extra time shows up in installation labour rates and can change the per m² figure.
This is also where finish quality impact shows up. A careful installer can make the floor look clean and consistent. Rushed work can leave gaps, uneven edges, and callbacks. If you want quality installation, the labour component needs to match the complexity of the space.
Region and logistics (metro vs regional differences)
Australia-wide pricing can shift because location changes the real cost to get work done. In metro areas, you often have more installer availability and easier access to supplies. In regional areas, regional cost differences can come from freight, travel time, and fewer trades on the ground. Even the same material supply cost can land differently once delivery and scheduling are included.
DIY vs Professional Installation (Cost vs Risk)
DIY can lower your upfront bill, but it can raise your total cost if you need a redo. Flooring is unforgiving when the base isn’t flat, cuts aren’t clean, or moisture is present. That’s why this decision isn’t only about installation labour rates. It’s about the finish quality impact and whether the job is simple enough to stay a true DIY project.
Use this section as a quick filter. If the scope is straightforward and the product is DIY-friendly, you can save money. If the job needs prep, precision, or moisture control, professional installation usually reduces risk and protects your long-term result.
| Decision factor | DIY-friendly (lower-risk) | Pro-recommended (higher-risk) |
|---|---|---|
| Best fit | One or two simple rooms, straight runs, minimal trims | Wet areas, stairs, open-plan spaces where lines show, many doorways |
| Common materials | Laminate flooring (click), some vinyl/hybrid click systems | Tile flooring, timber/hardwood, glued vinyl that needs a perfect base |
| Base condition needed | Already flat, clean, and dry | Needs assessment, levelling, moisture control, or repairs |
| Main cost driver | Material waste + your time | Installation labour rates + subfloor prep cost + finish quality impact |
| Typical failure risk | Gaps, uneven joins, poor edge cuts, movement | Waterproofing or bond failures, lippage/cracks, squeaks, finish damage |
| Best “value” outcome | Acceptable finish on a simple scope | Quality installation that avoids rework and holds up over time |
DIY-friendly jobs (lower-risk)
DIY installation works best when the flooring system is designed to lock together, and the room is easy to set out. Click-style laminate flooring and some vinyl flooring products can be manageable when the floor underneath is already flat and dry. In this kind of project scope, your biggest risk is usually simple: bad measuring and wasted boards. If you want the best chance of success, start with a small room and treat it as a test before you commit to a whole house.
DIY stays “lower-risk” when you keep the scope tight. The moment you add stairs, lots of transitions, uneven surfaces, or damp areas, the cost drivers (materials + labour) shift against you—because mistakes become harder to hide and more expensive to fix.
DIY scope limits (keep it simple)
- Room shape: Square or rectangular rooms with straight walls
- Floor base: No major dips; no need for levelling or patching
- Moisture risk: Dry rooms only; avoid bathrooms and laundries
- Edges & trims: Minimal doorways and transitions; simple skirting lines
- Product choice: DIY-friendly click laminate or click vinyl/hybrid
- Time budget: Allow extra time for careful cuts and alignment
Pro-recommended jobs (higher-risk)
Professional installation is usually the smart choice when the job needs precision, prep, or moisture protection. Tile flooring in wet areas is the classic example. It’s not only about laying tiles. It’s about levels, falls, adhesives, grout, and getting the installation process right so you don’t end up with cracks, lippage, or water-related issues later. Those are the unforeseen issues that turn “cheap per m²” into a costly repair.
Timber and hardwood are another high-risk category. The timber flooring price is high enough that small errors hurt, and the finish quality impact is obvious because timber shows gaps, squeaks, and poor joins. If subfloor prep cost is on the table—levelling, moisture barrier allowances, or surface repairs—professional installers often save money by preventing a redo and delivering a better finish the first time.
What to ask a professional installer to list (to avoid surprises)
- Prep scope: What subfloor prep cost includes (levelling, patching, grinding)
- Moisture measures: Any moisture barrier allowances and triggers for change
- Adhesives and trims: Exactly what adhesives and trims are included
- Stairs & transitions: How stairs, thresholds, and doorways are priced
- Finish standard: What “finished” means (edges, joins, clean-up)
- Variation rules: What changes the price if the floor condition differs on site
What to Send for an Accurate Flooring Estimate (Quick Checklist)
To price flooring cost per m² properly, we need the right inputs upfront. This quick flooring estimate checklist helps you avoid guesswork and reduce variations later. When you share clear plans, material selection, and site notes, we can apply the right estimating methods, map the contractor estimate components, and give you a number that matches your real project scope and various costs—so you can make an informed decision.
- Area / Plans: Floor plan, room sizes, and total square metres (or measurements).
- Material Selection: Tell us timber, laminate, vinyl/hybrid, tile, carpet, or polished concrete.
- Subfloor Notes: Any known dips, cracks, moisture history, or previous flooring type.
- Stairs & Transitions: Number of steps, landings, thresholds, trims, and doorways.
- Finish Details: Skirting needs, edge trims, patterns (straight lay vs herringbone).
- Timeline: When you want it done and whether the site is empty or occupied.
FAQs
The average flooring cost per m² in Australia depends on the material and the site conditions, so there isn’t one single “right” number. A realistic guide is to expect a range that changes with installation labour rates, finish level, and whether subfloor prep cost is needed. The safest approach is to treat averages as a starting point, then price your exact scope.
The cheapest option per square metre is usually laminate or basic vinyl, but the final total depends on what’s included. If the quote is supply-only, it can look cheaper than supply+install. Also, underlay cost, trims, and prep work can lift the total, so compare like-for-like before deciding.
Supply-only is mainly the material supply cost, while supply-and-install includes both materials and installation labour rates. Two quotes can look very different if one is supply-only and the other is supply+install. To make an informed decision, ask each contractor to list the contractor estimate components clearly.
Sometimes it is, but often it’s not fully included because it depends on what’s under the existing floor. Many quotes include a basic allowance, then adjust if levelling or repairs are needed. If you want a price that holds, ask whether subfloor prep cost is included, allowed, or excluded and what triggers a change.
Underlay is sometimes included for carpet and floating floors, but it can vary by quality level and brand. A quote might include a standard underlay and charge extra for upgraded acoustic or comfort underlay. Ask what underlay cost is included and whether it covers the areas you’re installing.
Tile work is labour-heavy because it involves more steps in the installation process—surface prep, levelling, cutting, adhesive work, grouting, and layout checks. Wet areas can add extra detailing that takes time. That’s why installation labour rates and total labour hours can be higher for tiles than for click flooring.
Conclusion
Flooring cost per m² in Australia isn’t just about the material. The final number changes with subfloor prep, moisture risk, install complexity, and the finishing details that often get missed. When those contractor estimate components are listed clearly, you can compare quotes properly and make an informed decision that fits your budget and timeline.
If you want a clear, practical figure for your project, AS Estimation & Consultants can help. Send your floor plan or measurements, your preferred material, and any notes about the existing floor. We’ll use proven estimating methods to give you a clean breakdown you can trust—so you can move forward with beautiful floors, quality installation, and a result that feels like an excellent investment.